Top 7 Hacks for Cleaning Computer Storage. Who loves cleaning? Even if your room is remotely in order, chances are, the things are much worse in your PC storage. The thing is, organizing documents and going through outdated data just feels like the waste of time.
That’s what happens if you take a long and inefficient approach to cleaning. However, decluttering should be approached with the help of technology – why do a task manually if it can be easily automated? In this article, we collected the list of best hacks that will speed up the process of storage cleaning.
Hack #1 – Decluttering space
Keeping your table clean actually improves your productivity – and it’s proven by numerous studies. The same algorithm works with your PC storage. Outdated files and poorly organized files mess up with your mind and prevent you from taking the most out of your working hours.
To increase your efficiency, start with orienting in your files. Here are some tips that will help you do it.
Files don’t belong on the desktop
Copying all downloads and mail attachments to the desktop is efficient in the short term since you can always reach out to the file. In the long run, however, it keeps your working space cluttered and distracts from actual work.
Create a habit of dividing files according to their purpose (work, leisure, hobbies), type (music, videos, documents), and origin (mail attachments, torrent downloads, browser extensions, and others).
File and folder names should make sense
Using random letter and number combination seems faster but it doesn’t actually save time. Give your files simple but rememberable name that you would logically use. It makes the document search much easier shall you ever forget the location.
Hack #2 – Use additional storages
Keep Cloud storage with backup copies
If something goes wrong with the internal storage, you should have a plan B. Cloud services provide a perfect opportunity for creating backup copies. You can preserve the name, formatting, and even folder structure from the original storage. On top of that, security sensitive files can be protected by passwords and even encrypted. Start with popular services like Dropbox and Google Drive – they allow previewing and editing saved documents.
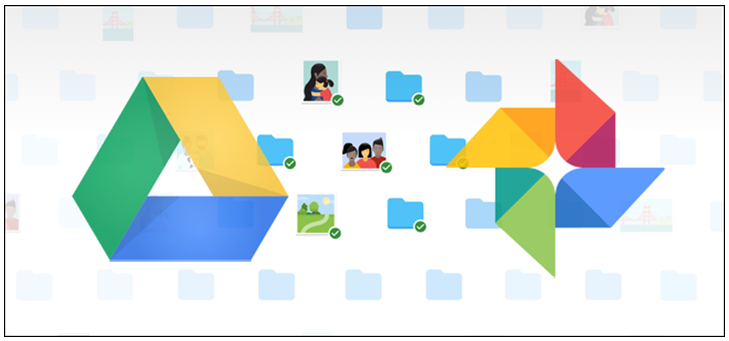
Use Google Photos to organize images
Synchronize images form your camera, phone, or tablet with the Cloud image storage, powered by Google servers. This way, you don’t have to hassle with sending images back-and-forth from PC to a mobile phone and vice versa – all content will be stored in one place.
Clean a download folder properly
If you lack the device’s memory, your first destination should be the ‘Downloads’ folder. Perhaps, you’ve accidentally downloaded several copies of the same file or forgot to delete the original file after copying it to another folder or to the Cloud. At the end of the day, you end up with a heavy load of outdated files which take the most of your memory space.
Hack #3 – Analyze disk space automatically
The old-fashioned way would be to go from one folder to another, checking the files thay you don’t usually use and getting rid of them one-by-one. It might still work fine if you have a small storage, but if you store several hundreds of folders in your PC, there is no way you’ll be able to go through each manually.
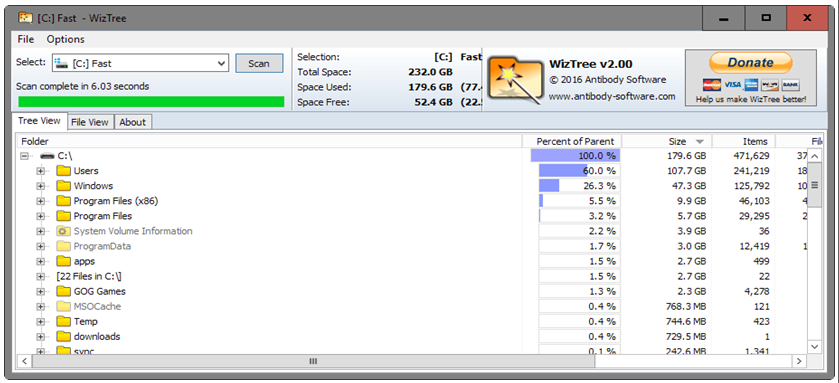
The solution is automation. We recommend using WizTree or CCleaner to determine which files are not used, broken, or outdated. All analyzing tools allow users to adjust the algorithm. Youan start cleaning from those files that are used the least or firstly review the most lucrative ones that take the majority of space.
A small tip: pick an analyzation tool that displays the entire folder structure so you can get rid of unwanted folders at once if you want to.
Hack #4 – Delete temporary files
As their name already tells you, these files are not essential for the system’s functionality. The scope of temporary data is to speed up future website visits and improve desktop tool’s functionality.
Temporary files are easy to clean when you use a professional junkware removal tool. We recommend CCleaner or PrivaZer. You can use a built-in Disk Cleanup but it sometimes tends to miss several dozens of files.
CCleaner allows users to divide Windows native software and additional tools. You can select one of these categories or even both. We advise you to start with native software because it usually accumulates the bigger number o temporary files. Also, you hardly use even 50% of all built-in Windows tools whereas their temporary data still keeps your space occupied.
If you decide to clean browsers’ cookies, you will be logged out of all services. Your browsing history can be deleted as well as saved passwords and log-ins. That’s why deleting cookies is not a good idea unless you are really struggling with the lack of space.
Hack #5 – Check your pagefile
Pagefiles store the page caches and use your storage space to save this data. Cleaning these files is the easiest way to clean your storage without facing any consequences. Basically, you’ll be just deleting files that you never use.
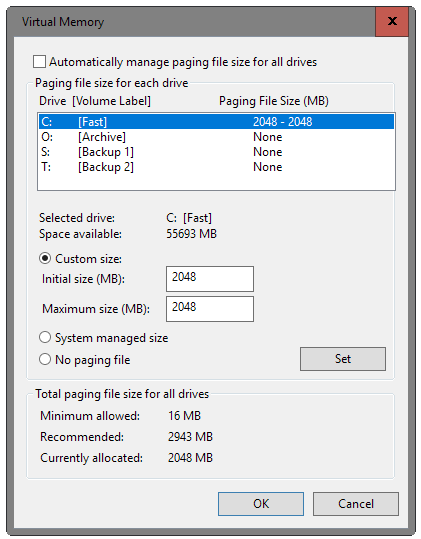
How to access pagefile?
- Use a keyboard shortcut (Windows + Pause) to access the System Control Panel window;
- Find the tab ‘Advanced System Settings’ in the menu and open it;
- Open the Performance Settings and access Windows Properties window;
- Choose the advanced view and select the ‘Change’ button.
Now you see all the hard drives and the paging size that corresponds to each of them. You can disable the biggest pagefiles (2-3 GB per file) and regain a lot of memory space.
Hack #6 – Disable a Hibernate feature
Hibernate is the feature that automatically saves data if the system crashed, allowing users to restart work without losing data. For instance, if you’ve been working on a Word document and power suddenly went off, this mode will leave all changes, done prior to the crash.
Generally, it’s a useful feature but the thing is, you don’t use it all that much. Memory expenses, on the other hand, are quite significant. All these backup file versions are stored on your drive and slow the system down.
Hibernate records data to a hiberfil.sys file. By cleaning these files regularly, you free a lot of space and improve the efficiency of your system. If you use Cloud storages and editors (Google Drive and connected Google Docs, Google Slides, and others), it makes no sense to keep the hibernate mode active.
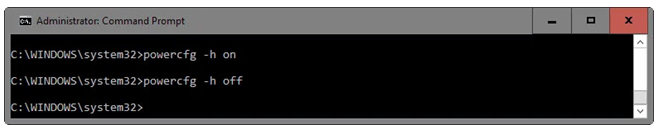
How to disable the Hibernate modality?
- Press the Windows key, search for cmd.exe, hold the Ctrl + Shift combination, and confirm the operation by hitting Enter.
- The system will redirect you to the User Account Control prompt.
- Here, run a command ‘powercfg.exe. -h off.
- If you need to use it again, you’ll have to enter ‘powercfg.exe. -h on’.
- As soon as the ‘off’ command is entered, the Hibernate mode will be entirely disabled from your OS.
This hack is a must-use for those who work in online editors or use their PC mostly for browsing, not for content creation. Before taking a final decision, analyze how often blackouts happen to your system and how much memory your system will clear once the hibernate mode is disabled.
Hack #7 – System Restore
System Restore mode allows your PC to take automatic screenshots of your activity which would allow restoring the system to its current state. If you download a dangerous upload or make an unfortunate change of settings, you can use this feature to bring things back to the way they were.
Again, it’s a great feature by its design but it really takes up a lot of space. Considering that the majority of users never use it or are even aware of its existence, chances are, you won’t use it too. System Restore uses a lot of drive space and disabling it is an easy way to preserve memory.
If you don’t want to disable it fully, you can just edit the frequency with which the system will take screenshots. It means, the possibility to return the system to its original state will not fully disappear, only that the system now will have fewer screenshots to work with.
How to edit the System Restore mode?
- Press Windows + Pause combination to access the System Control Panel;
- Select the ‘System Protection’ button;
- You’ll see a list with drives and their protection state. When the indicator shows ‘On’, it means that System Restore is enabled.
- Find the main drive (on the majority of computers, it’s a C disk) and choose the ‘Off’ modality on the System Restore indicator.
- To keep the mode on but reduce the screenshot making frequency, you can reduce the usage of a feature by setting a desirable percent. The bigger the value, the higher will be the frequency.
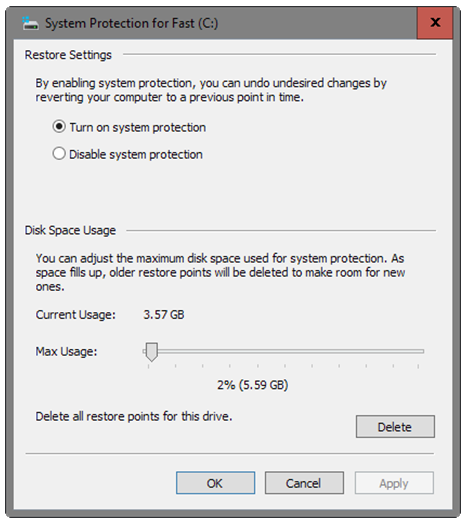
A small tip: put a small percentage for your main drive (around 2-3%) and disable the feature on all other drives.
Let’s clear a couple of things
Don’t be too enthusiastic about cleaning your PC. When you decide to automate the process of deleting outdated files or delete temporary data, you may add up with some collateral damage. You can accidentally erase useful information or disturb the functionality of essential software.
To make sure such accidents don’t happen, break your cleaning process into small parts. After you’ve organized all files into easy-to-manage folders, review system files. Start cleaning your C drive gradually, eliminating folders one by one. This way, if you notice a problem, you will know what deletion caused it. With that, you’ll be able to use a file restoration software and rewrite deleted files.
Informative blog thnx for this!
https://www.aquilaclouds.com/post/custom-tailored-and-integrated-billops-system-for-multi-cloud-csps